Domain RegistrationFind and register the perfect domain for your website.
 .COM DomainChoose a widely recognized domain to build global credibility.
 All TLDsFind and register your perfect domain. Choose from local and global extensions.
 whoisCheck domain ownership details, expiration dates, and registrar information.
 US DomainRegister a .US domain and build trust in the USA.
 Web HostingEverything your website needs to run smoothly
 WordPress HostingWordPress hosting that just works
 Windows HostingReliable hosting for Windows environments
 Reseller HostingTurn hosting into your business
 Email HostingEmail that looks professional and works anywhere
 cPanel HostingFull control of your hosting with cPanel
 Affiliate ProgramJoin as a partner and earn commissions on every referral you send our way.
 Vps HostingScalable virtual servers that expand as you need.
 Dedicated ServersGet complete access and full control over your dedicated physical server.
 Managed vpsNot tech-savvy? We will take care of everything with our fully managed VPS hosting for you.
If you’re a web developer or site admin, knowing how to create and manage MySQL databases in cPanel is super important.
Luckily, cPanel makes it easy for everyone, even if you don’t have a tech background.
In this article, we’ll walk through how to create MySQL databases in cPanel, manage users, and do essential tasks to keep your database running smoothly.
Whether you’re starting a new website or taking care of an existing one, learning to use cPanel’s tools will help you manage your data like a pro!
What is MySQL and Why is it Important?
Let’s talk about MySQL.
So, what is it?
Well, MySQL is a popular open-source database management system that helps you store and manage data.
It’s been around since 1995 and has become a favorite among developers and businesses.
Why? Because it’s strong, easy to use, and great for handling structured data.
This makes it perfect for websites and web applications that need to keep track of lots of information.
Now, why do websites and apps use MySQL so much?
It’s simple! MySQL acts like the backbone for many systems, like content management systems, online stores, and other apps that need to manage user data, product listings, and transaction details.
With MySQL, developers can efficiently handle huge amounts of data, creating interactive experiences for users.
Managing a database well is super important for keeping websites running smoothly and safely.
A well-organized MySQL database helps ensure that data can be accessed quickly, which makes websites load faster and keeps users happy.
Plus, MySQL has strong security features that protect sensitive information from getting into the wrong hands.
This is especially important for businesses that deal with private customer data.
Accessing MySQL Databases in cPanel
If you’re looking to manage your MySQL databases in cPanel, you’re in the right place! Let’s walk through it together, step by step.
Step 1: Log into cPanel
First things first, grab your web browser and type in your cPanel URL.
Enter your username and password to get into the control panel.
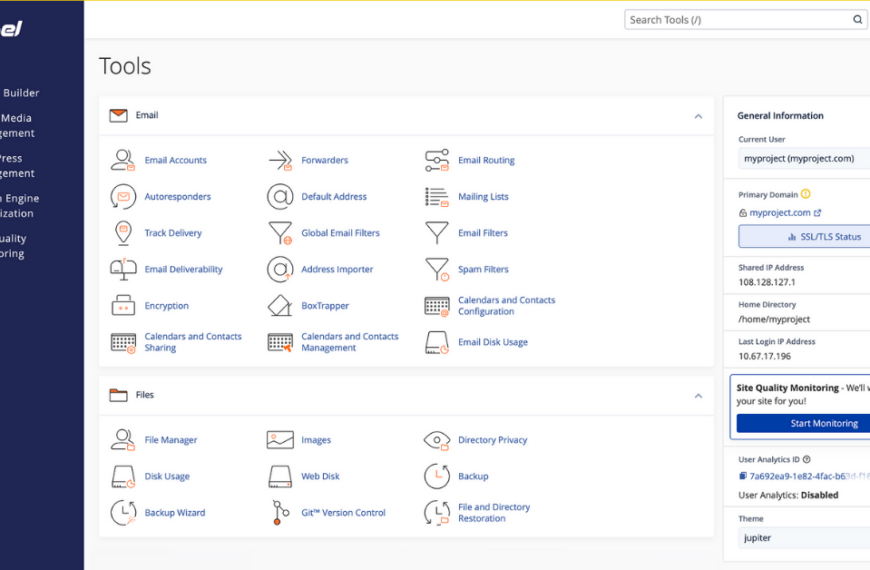
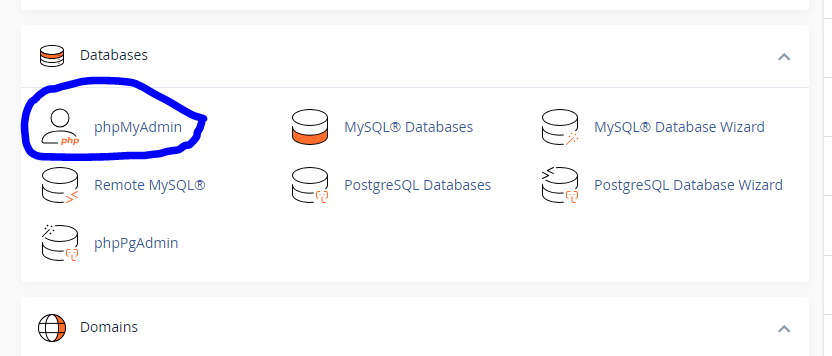
Step 2: Find the Databases Section
Once you’re logged in, look for the Databases section on the main page.
This area has all the tools you need to manage your databases.
Step 3: Access MySQL Databases
Next, click on the MySQL Databases option in the Databases section.
This is where you can create and manage your MySQL databases in cPanel, set up users, and control their privileges.
The MySQL Databases feature in cPanel is super handy.
In cPanel, you can easily create new MySQL databases, add users, and decide who gets to do what with your data.
This is important for keeping your website or app running smoothly by managing where your data is stored and who can access it.
How to Create MySQL Databases in cPanel
To create a MySQL databases in cPanel is easier than you might think! Let’s walk through it together.
Step 1: Go to the MySQL Databases Section
First, log into your cPanel account.
Once you’re in, look for the MySQL Databases option under the Databases section.

Go ahead and click on it!
Step 2: Enter a Name for the New Database
Now, find the Create New Database field. Here, you’ll need to type a name for your new database.
Remember, you can use up to 64 characters for the name, but keep in mind that each underscore counts as two characters.
Also, try to avoid special characters like slashes (/), quotation marks (“), or apostrophes (‘).
Step 3: Click Create Database
Once you’ve chosen a name that works for you, click on the Create Database button.
If everything goes well, you’ll see a message confirming that your database has been created!
Best Practices for Naming Databases
Use Descriptive Names: Pick names that clearly show what the database is for.
For example, you could use names like user_data or product_inventory.
Avoid Special Characters: Stick to letters, numbers, and underscores.
This will help prevent problems when you’re running queries and scripts.
Consistency is Key: Try to use the same naming style throughout all your databases.
Whether you choose snake_case (like_this) or camelCase (likeThis), it makes your work easier to read and keep organized.
Limit Length: Even though you can use up to 64 characters, shorter names are often simpler to remember and manage.
Creating and Adding MySQL Database Users
Step-by-Step Guide to Creating a MySQL User in cPanel
1. Scroll to the MySQL Users Section:
First, log into your cPanel account.
Once you’re in, find the MySQL Databases area.
Look for the MySQL Users section; this is where you’ll create new users and set their access levels.
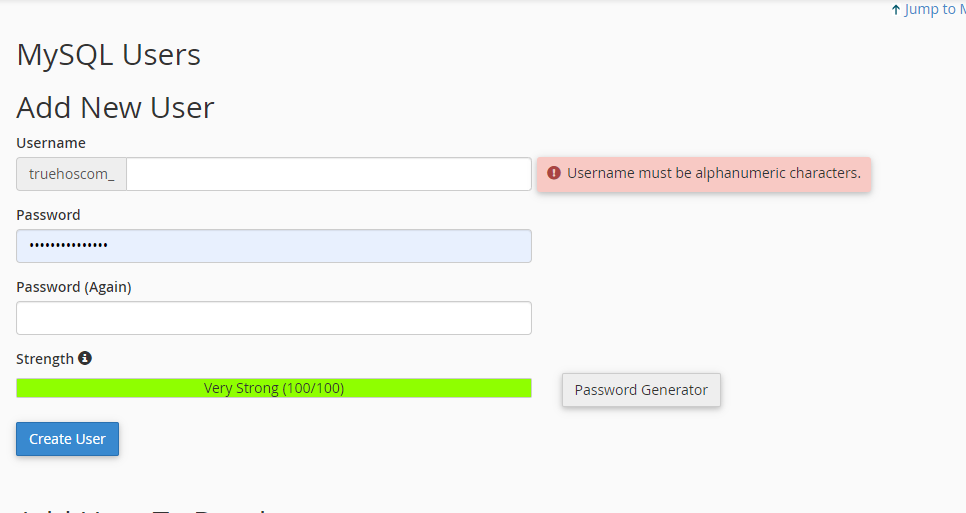
2. Enter a Username and a Secure Password:
Now, in the boxes provided, type a unique username for your new user. Next, pick a strong password.
A good password has a mix of uppercase and lowercase letters, numbers, and special characters.
This makes it much harder for anyone to guess!
3. Click Create User:
Once you’ve filled in the username and password, hit the Create User button.
If everything goes well, you’ll see a confirmation message letting you know the user was created successfully.
Importance of Using Strong Passwords for Security
Let’s talk about passwords for a moment.
Using strong passwords is super important to keep your MySQL databases secure.
If your password is weak, it can be guessed or cracked easily, which puts your data at risk.
Here are some tips for creating a strong password:
Length: Aim for at least 12 characters.
Mix it up: Use a combination of uppercase and lowercase letters.
Include numbers and special characters: This adds an extra layer of security.
Avoid obvious choices: Don’t use easily guessable information, like your birthday or common words.
Assigning Users to MySQL Databases
Step-by-Step Guide on Assigning a User to a Database
Scroll Down to the Add User to Database Section:
First, go to the MySQL Databases area in cPanel.
Look for the “Add User to Database” section.
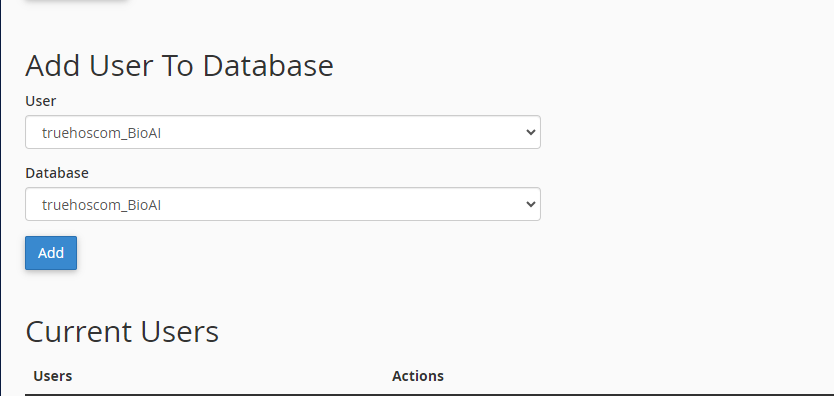
This is where you can connect users to specific databases.
Select the User and the Database from Dropdown Menus:
You’ll see dropdown menus here.
Choose the user you want to assign and the database you want to give them access to.
Click Add:
Once you’ve picked the user and the database, hit the “Add” button.
This will start the process of setting up their privileges.
Choose User Privileges:
Next, you’ll need to select the user privileges.
You have two options: you can pick All Privileges for full control over the database, or you can choose specific privileges, like:
SELECT: This lets the user read data from tables.
INSERT: This allows the user to add new records.
UPDATE: This enables the user to change existing records.
DELETE: This gives permission to remove records.
CREATE: This allows the user to create new tables or databases.
DROP: This lets the user delete tables or databases.
Brief Explanation of Each Privilege
SELECT: Lets you read data from a table.
INSERT: Allows you to add new data into a table.
UPDATE: Helps you modify existing data in a table.
DELETE: Lets you remove data from a table.
CREATE: Enables you to create new tables or databases.
DROP: Permits you to delete tables or databases.
Managing Existing MySQL Databases in cPanel
Let’s talk about how to manage your MySQL databases in cPanel. This guide will help you view, change, and delete your databases easily.
Viewing Databases
To check out all your databases in cPanel, follow these steps:
Log into cPanel: Start by signing into your cPanel account using your username and password.
Navigate to MySQL Databases: Look for the Databases section and click on the MySQL Databases option.
Here, you’ll see a list of all the databases linked to your account under the Current Databases section.
Modifying Databases
If you need to change database users or their permissions, here’s how to do it:
Change Database Users or Passwords:
In the MySQL Databases section, find the user you want to change under Current Users.
Click on the Change Password link next to their username. Enter a new secure password and confirm it.
Manage Database Privileges:
To change what a user can do, find the user under Current Databases and click on their username.
This will take you to the Manage User Privileges page, where you can choose which privileges (like SELECT, INSERT, UPDATE) to give or take away.
Once you’re done, click on Make Changes to save your settings.
Deleting Databases
If you need to delete a database you no longer use, just follow these steps:
Backup Important Data: Before you delete anything, make sure to back up important data.
You can use tools like phpMyAdmin or cPanel’s backup features to do this.
Delete the Database:
In the MySQL Databases section, scroll down to the Current Databases list.
Find the database you want to delete and click on the Delete link next to it.
Confirm the deletion when asked. Remember, this will permanently remove the database and everything inside it.
Conclusion
In this article on How to Create and Manage MySQL Databases in cPanel, we explored the essential steps for accessing the MySQL databases section, creating new databases and users, assigning specific privileges to users, and effectively managing existing databases.
To ensure safety and optimal performance, we highlighted the importance of regular database backups and securing user access with strong passwords.
cPanel simplifies MySQL database management, making it user-friendly, even for beginners, and enabling them to perform complex operations easily.
By mastering these skills, you can enhance your website’s functionality and security for a better user experience.