Domain RegistrationFind and register the perfect domain for your website.
 .COM DomainChoose a widely recognized domain to build global credibility.
 All TLDsFind and register your perfect domain. Choose from local and global extensions.
 whoisCheck domain ownership details, expiration dates, and registrar information.
 US DomainRegister a .US domain and build trust in the USA.
 Web HostingEverything your website needs to run smoothly
 WordPress HostingWordPress hosting that just works
 Windows HostingReliable hosting for Windows environments
 Reseller HostingTurn hosting into your business
 Email HostingEmail that looks professional and works anywhere
 cPanel HostingFull control of your hosting with cPanel
 Affiliate ProgramJoin as a partner and earn commissions on every referral you send our way.
 Vps HostingScalable virtual servers that expand as you need.
 Dedicated ServersGet complete access and full control over your dedicated physical server.
 Managed vpsNot tech-savvy? We will take care of everything with our fully managed VPS hosting for you.
The Exchange Open Shared Mailbox is a fantastic tool for teamwork.
It lets many people share a single mailbox, so teams can easily work on emails and calendars together without having to log in individually.
This is particularly useful to departments that handle customer questions, making responses faster and service better.
In general, though, shared mailboxes make the work environment a more collaborative and efficient place.
What is an Exchange Shared Mailbox?
An Exchange Shared Mailbox is an open facility that allows multiple users to access and operate on the same email mailbox.
It’s all very good for teams and organizations that must communicate effortlessly.
For instance, you might use a common email address, such as [email protected] or [email protected].
Using a shared mailbox, the whole team can all read and respond to emails together, and it’s so easy to deal with customer inquiries.
Why should you use a shared mailbox?
Well, there are plenty of benefits!
For one, it keeps everyone on the team up to date.
Because all members have access to incoming messages, it’s easy to see who’s dealing with which question.
This will also make it simpler to assign work and follow up on the progress of ongoing discussions.
What’s more, shared mailboxes include a shared calendar, so team members can schedule meetings and see when others are available.
This really helps with planning!
How they differ from individual mailboxes
Now, you might wonder how shared mailboxes differ from regular mailboxes.
Common mailboxes are tied to a single user account and have their own login credentials.
Shared mailboxes, for their part, lack their own usernames and passwords.
Instead, members sign in to use their own accounts, after obtaining permission.
And this arrangement keeps things locked up and everybody informed of what’s going on in the collective mailbox.
Setting Up a Shared Mailbox in Exchange
It is so simple to set up an open shared mailbox in Exchange and it makes teams work so much better together.
Here’s a quick guide to help you create and set up a shared mailbox, along with how to manage permissions.
1. Log in to the Exchange Admin Center:
Begin by visiting the Exchange Admin Center (EAC) at admin.exchange.microsoft.com.
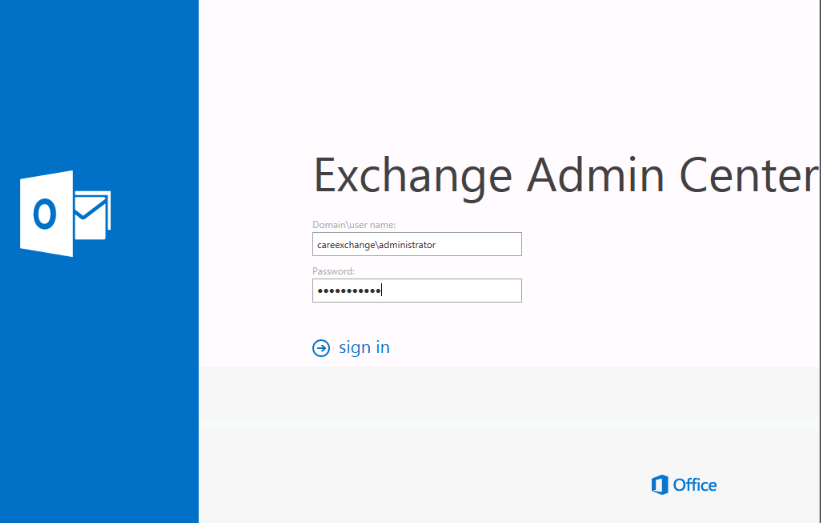
Sign in using your admin account.
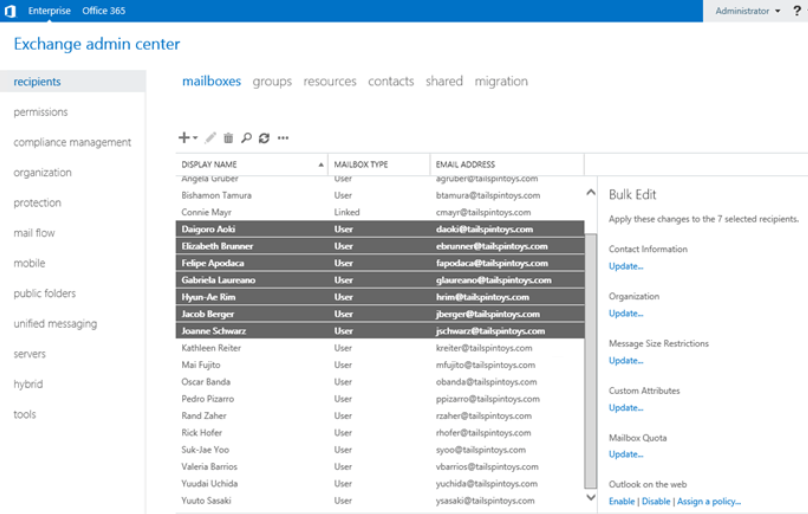
2. Create the Shared Mailbox:
In the EAC, click on “Recipients” on the left side, then choose “Mailboxes.
Click on “Add a shared mailbox.”
Fill in the required fields:
Display Name: That’s what people will read when they get emails (like “Support Team”.
Email Address: Pick a username for the shared mailbox (like [email protected]).
Choose your organization’s domain from the drop-down menu.
Click “Create” to finish setting up the shared mailbox.
3. Add Members to the Shared Mailbox:
Once you’ve created the mailbox, you’ll be presented with a button that says ‘Add users to this mailbox.’
Click that, choose the people you want to allow access to, and press ‘Save.’.
4. Set Permissions:
There must be, for users, permissions on the shared mailbox if they are to use it correctly:
Full Access: It provides full control over the mailbox so that the user can handle all that is inside. It allows users to read, delete and manipulate the contents of the mailbox.
Send As: It allows users to send emails from the shared mailbox as if they’re coming from their own account.
Send on Behalf: Allows users to send emails in a way that indicates they are sending as the owner of the shared mailbox.
You can define these permissions at the time of adding members or afterwards in the mailbox settings.
Be sure to give out these permissions judiciously, according to team roles, in order to protect information, but also facilitate good teamwork
5. Accessing the Shared Mailbox:
Once the permissions are in place, users can access the shared mailbox via their Outlook profiles.
If it doesn’t appear automatically, they may have to manually add it.
Accessing an Exchange Open Shared Mailbox
Now, let’s go through how to access group mailboxes in various email clients.
Accessing Shared Mailboxes in Outlook
For Windows Outlook (Desktop Version)
1. Open Outlook: Start the Outlook app on your computer.
2. Add the Shared Mailbox:
Click on the File tab at the top left.
Select Account Settings, then again click on Account Settings.
Choose your email account and click on Change…
Hit More Settings, and go to the Advanced tab.
Click Add, enter the shared mailbox email address, and click OK.
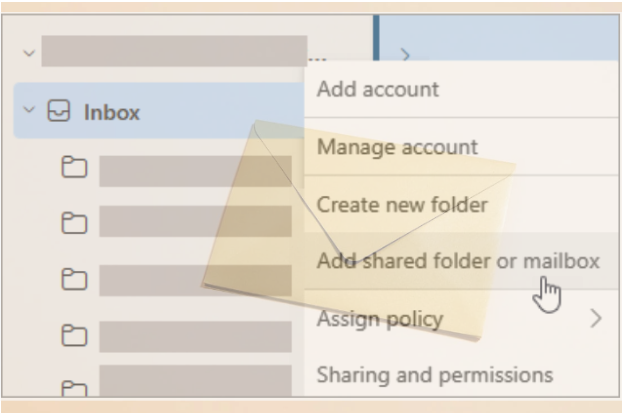
3. Access the Mailbox: Now you’ll find the shared mailbox in your list of folders on the left side of Outlook.
For Outlook on the Web
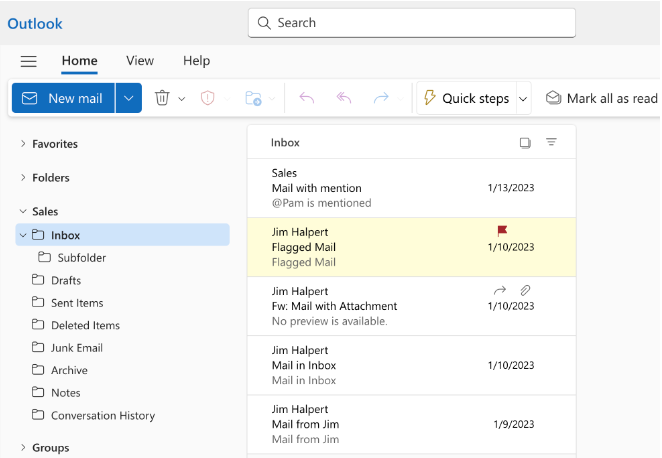
1. Log In: Open your web browser and sign in to Outlook on the web. Sign in with your account details.
2. Open Another Mailbox: Open Another Mailbox:
Click on your avatar (your picture or initials) in the top right corner.
Select Open another mailbox.
Type in the name or email address of the shared mailbox and click Open.
Sending Emails from a Shared Mailbox
If you compose a new email, click in the From box to choose the shared mailbox as the sender.
If you don’t see it, navigate to Options, and in Show From select the shared mailbox.
Accessing Shared Mailboxes in Thunderbird
1. Open Thunderbird: Launch Thunderbird on your device.
2. Add Account:
Go to File > New > Existing Mail Account…
Your name, the shared mailbox address, and your password.
Click Continue and adjust any server settings if needed.
3. Accessing Mailbox: This shared mailbox will appear in your folder pane after you’ve set it up.
Accessing Shared Mailboxes in Other Email Clients
If you use other email services, you can typically sign in with your single sign-on (SSO) credentials or private account information:
Go into your email client and find the button to add a new account, or new mailbox, or whatever.
When prompted, type in the shared mailbox’s email address and your login information.
You may have to add IMAP/SMTP settings manually, if it doesn’t fill them out for you.
General Steps for Accessing Shared Mailboxes
For the most part, you can log in to a shared mailbox with your SSO username and password as you would for your own account in most email clients.
You must have access and permissions to read and write to the contents of the shared mailbox.
Managing Permissions and Roles in Shared Mailboxes
When working with a shared mailbox, setting up permissions and roles is essential.
It is that it gets everyone to cooperate peacefully and in a sense, it keeps things private.
Here’s a simple guide on the main permissions for shared mailboxes, plus tips on managing users and assigning roles.
Overview of Permissions
Full Access
What it means: This access grants users full read/write access to every aspect of the shared mailbox. They can read, delete, and manage emails as needed.
When to use it: Especially good for team members who must do everything with the mailboxes (such as customer service reps replying to messages).
Send As
What it means: With this permission, users can send emails from the shared mailbox as if it’s the mailbox itself. The recipient is not aware that the email came from the shared address.
When to use it: Good for maintaining a uniform sender identity, such as when replying as a support or sales team.
Send on Behalf
What it means: This allows people to send mail ‘on behalf of’ the shared mailbox, meaning that recipients receive both the user’s name and the name of the shared mailbox.
When to use it: Useful when it’s appropriate to indicate who’s responding while still in the name of the team.
Managing Users and Assigning Roles
Adding Users to a Shared Mailbox
1. Go to Admin Center: Log into the Microsoft 365 admin center using your admin credentials.
2. Find the Shared Mailbox: Go to Groups Shared mailboxes and select the mailbox you wish to control.
3. Add Members: Click Add members to this mailbox, and then choose those people you want to have access to. Click Save to confirm.
Assigning Permissions
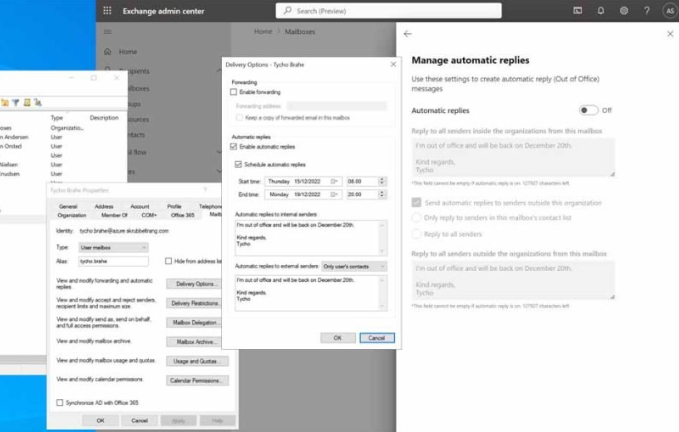
1. Open Permissions Settings: In the shared mailbox, go to the Permissions section.
2. Assign Roles: For each user, select Full Access, Send As, or Send on Behalf depending on the user’s role on the team. Save changes to apply.
Monitoring Access
Periodically review who has access to common mailboxes and what rights they possess.
This prevents unauthorized access and limits who is able to control the contents of mailboxes.
You could employ auditing tools to monitor user activity in shared mailboxes.
When clear permissions and roles are established, teams can work more effectively and protect confidential data.
This architecture provides each party with the access it needs to work productively and to communicate well.
Fixing Exchange Open Shared Mailbox Problems

Common Permission Issues
Corrupted Permissions: Permissions could be the problem if someone can’t get into a shared mailbox.
Sometimes permissions get messed up or duplicated.
You can check and reset permissions using PowerShell. Try running this command:
Get-Mailbox -Identity <SharedMailbox> | Get-MailboxPermission
If you see unclear or duplicate entries, remove and re-add the permissions.
Not Enough Permissions: Ensure that the user has the proper permissions.
You can do this in the Exchange Admin Center, or ask the mailbox admin to update it if needed.
Error Messages: In case the user receives an error such as “You are not authorized to send as this user,” permissions may not be configured correctly.
Make sure they have Full Access and Send As privileges.
Missing Shared Mailbox
If a common mailbox doesn’t appear in Outlook, you can try the following:
1. Check that the user has the correct permissions.
2. Make sure that the mailbox is listed in Outlook under File Account Settings.
3. If using Cached Exchange Mode, try turning it off to see if the mailbox appears.
Read also: Cannot Expand the Folder in a Shared Mailbox? Here’s How to Fix It
Tips for Syncing and Visibility Issues
1. Check Cached Exchange Mode: If emails are slow, or updates are slow, then try disabling Cached Exchange Mode. Here’s how:
Go to File > Account Settings > Account Settings.
Find your account and click Change, then untick Use Cached Exchange Mode, and restart Outlook.
2. Update Outlook: Make sure Outlook is updated. Outdated software can cause compatibility issues with shared mailboxes.
3. Clear Auto-Complete Cache: If sending from the shared mailbox gives trouble, empty the auto-complete list for that mailbox, so it will not give an error.
4. Disable Add-ins: Some add-ins can cause trouble. Go to File Options Add-ins, manage COM Add-ins, and disable any you don’t need.
5. Recreate Outlook Profile: If things continue to be problematic, the Outlook profile can usually be recreated to resolve more serious mailbox access problems.
Conclusion
When used effectively, open shared mailboxes in Exchange can improve teamwork and communication.
If admins assign the proper permissions, it works fine for team members.
Fixing the same problems that occur all the time such as permission or sync issues and making things run smoothly without interruption.
With these strategies, organizations can make the most of shared mailboxes, fostering teamwork and increasing productivity.