If you’re using Hostinger for your mail and love the simplicity of Gmail, then you’re in for a treat!
The mail Hostinger Gmail integration allows you to manage everything in one place.
This integration is a game-changer, especially for businesses or anyone who wants to stay organized while looking professional.
When integrated with Hostinger, Gmail provides access to its advanced functionality including sophisticated searching and filtering along with a user-friendly interface.
That is, you will no longer have to manage different email accounts.
From work emails to casual messages, everything will be in one place, neatly organized and simple to retrieve.
Therefore, if you want a smoother, more effective way of managing emails, it may be of interest to you, for either business or personal use.
Why Link Your Hostinger Mail to Gmail?
Linking your Hostinger email to Gmail can make managing your emails much easier and more efficient.
Here’s how:
Everything is in One Place:
If you link your Hostinger email to Gmail, you have access to all your emails in one place.
This means no more switching between different email platforms.
All your messages whether from Hostinger or Gmail are checkable and manageable from the Gmail view.
It saves you time and hassle, and keeps everything organized in one convenient location.
Unlock Gmail’s Powerful Features:
Using Gmail as a primary email client, you have access to some of its email management features, which are useful in managing emails much more easily.
For instance, Gmail’s sophisticated search functionality enables users to easily locate specific emails, and its filtering features allow users to structure their inbox in a way that is sensible for their own needs.
Features like auto-advance let you move between emails without going back to your inbox, which speeds up your workflow.
Plus, with custom labels and filters, you can prioritize important emails and keep everything in order.
Prerequisites for Integration: Get Ready to Link Your Hostinger Email with Gmail
Before you start connecting your Hostinger email to Gmail, there are a few things you’ll need to have in place.
Let’s go through them!
Active Accounts: Ensure that you possess two active accounts, that’s a Gmail account and a Hostinger account.
You’ll need both to set up the integration.
Necessary Credentials: In order to prepare, there are a couple of pieces of information:
Your Hostinger email address (the full one, like [email protected]).
Password for your Hostinger email account.
Server Settings: You’ll also need the server settings to complete the integration.
In particular, you’ll also have to provide the server information (SMTP, POP3 or IMAP) of your Hostinger email.
You can usually find this information in the “Emails” section of your Hostinger dashboard, or if you’re unsure, just reach out to Hostinger support for help.
Once you have these basics covered, you’ll be all set to connect your Hostinger email to Gmail, making it easier to manage all your emails in one place!
How to Add Hostinger Mail to Gmail
Now it’s time to manage your Hostinger email in Gmail.
Follow this simple guide to get everything set up so you can enjoy the convenience of having all your emails in one place.
Step 1: Open Gmail Settings
1. Log in to Gmail: First, open your web browser and go to Gmail. Enter your login details to access your account.
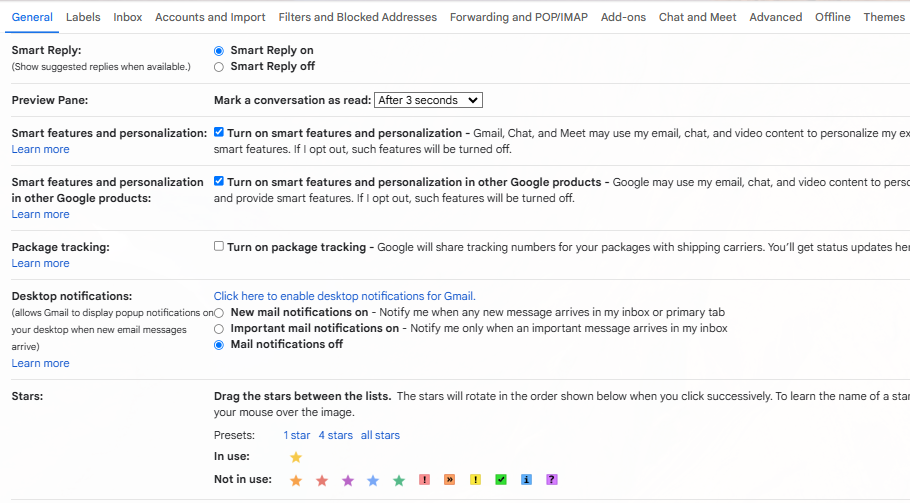
2. Go to Settings: Click on the gear icon in the top right corner and choose “See all settings” from the dropdown.
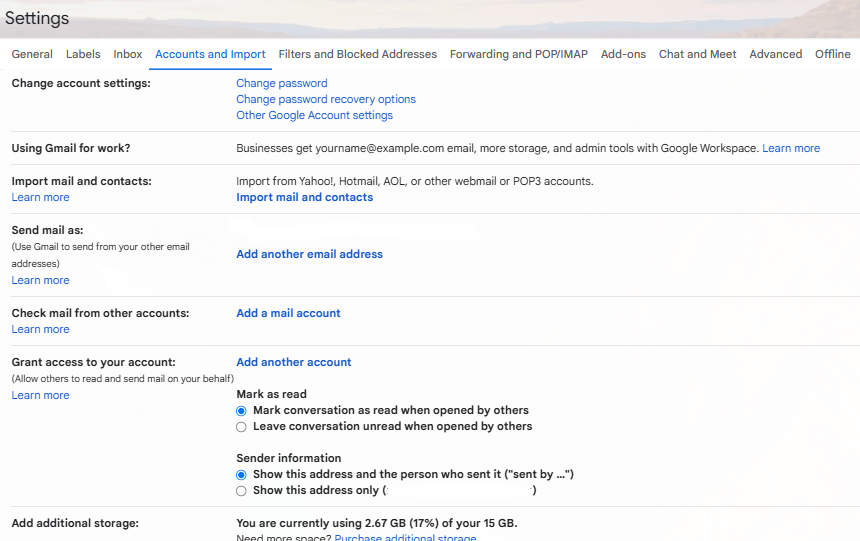
3. Find Accounts and Import: Select the “Accounts and Import” tab in the settings menu and open it to begin to input your Hostinger email.
Step 2: Set Up Your Hostinger Mail Settings
1. Add a Mail Account: In the “Add mail account” section under “Check mail from other accounts” click “Add a mail account.
2. Enter Your Hostinger Email Address: A new window will pop up asking for your email. Enter your full Hostinger email and click “Next.
3. Choose POP3 or IMAP: You’ll have the option to choose either POP3 or IMAP.
If you need a way to synchronize your emails across several devices, then choose IMAP.
If you select POP3 then tick the box at the bottom for “Retain the server copy of retrieved message” make note that you will retain a copy in Hostinger.
4. Input Your Server Settings:
For Incoming Mail (POP3):
Server: pop.hostinger.com
Port: 995
Encryption: SSL
For Outgoing Mail (SMTP):
Server: smtp.hostinger.com
Port: 465 (SSL) or 587 (TLS)
Use your Hostinger email address and password for authentication.
5. Finish Setup: After filling in the details, click “Add Account.
You may need to confirm your email address by clicking a link sent to your Hostinger inbox.
Step 3: Test Everything
1. Send a Test Email: Once you’re set up, try sending an email from your Hostinger address to yourself.
Check if it appears in your Gmail inbox.
2. Check the Syncing: Make sure that emails sent to your Hostinger email are being delivered to your Gmail.
Also, check the possibility of sending emails from Gmail using your Hostinger mail.
Managing Hostinger Email from Gmail
Being able to manage your Hostinger email through Gmail will be a HUGE productivity and organizational help.
Okay, let’s walk through how to create filters and labels so that everything stays organised as well as how to send emails from your Hostinger email address using Gmail.
Creating Filters and Labels for an Easier Inbox
Step 1: Access Gmail Settings
First, log into your Gmail account.
In the top right corner, click the gear icon and select “See all settings” to open your full settings.
Step 2: Go to Filters and Blocked Addresses
Next, click on the “Filters and Blocked Addresses” tab in the settings menu.
Step 3: Create a New Filter
At the bottom, click on “Create a new filter”.
This lets you decide what emails you want to organize automatically.
Step 4: Set Your Filter Criteria
You can set filters based on things like the sender’s email address, subject, or even certain keywords.
After setting it up, click “Create filter”.
Step 5: Choose What Happens to the Filtered Emails
Gmail will show you options for what to do with the filtered emails.
You can apply a label, archive the email, or mark it as important.
If you want to apply a label, check “Apply the label”, and pick an existing label or create a new one.
Step 6: Save the Filter
Once you’re happy with your settings, click “Create filter” to save it. Now, Gmail will automatically sort your emails based on the filter you just set.
Filters and labels make it super easy to keep your inbox under control, with Gmail doing the organizing for you!
Sending Emails from Your Hostinger Email Address via Gmail
Step 1: Access Gmail Settings Again
Again, log in to Gmail, click on the gear icon in the top right corner, and choose “See all settings”.
Step 2: Add Your Hostinger Email Address
Under the “Accounts and Import” page, scroll down to the “Send mail as” section and click on “Add another email address.
Step 3: Enter Your Hostinger Email Info
In the popup window, enter your Hostinger email address and click “Next Step”.
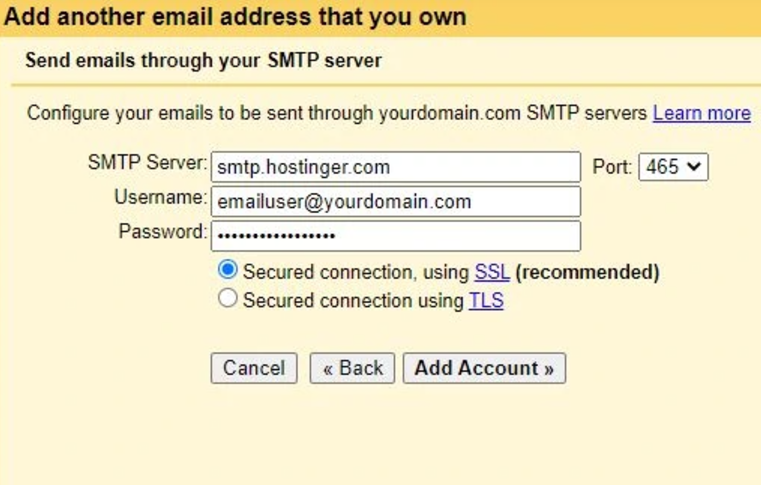
Step 4: Set Up SMTP Settings
Now you’ll need to enter the SMTP settings for Hostinger:
SMTP Server: smtp.hostinger.com
Port: 465 (SSL) or 587 (TLS)
Input your Hostinger email as the user name and its password.
Step 5: Verify Your Email Address
Gmail will send the confirmation email to your Hostinger email.
Log into the Hostinger Webmail, locate the email, and click the verification link to complete the process.
Step 6: Start Sending Emails from Your Hostinger Address
Once everything is set up, when you compose a new email in Gmail, you’ll see your Hostinger email address in the “From” dropdown.
Just select it and start sending!
With filters, labels and push options from your Hostinger email to your Gmail, everything is neat and you can start sending email like a pro all in one platform!
Common Challenges and How to Fix Them
In attempt to get your Hosting mail account integrated with Gmail, you will likely encounter a few roadblocks.
No bother—these are pretty ubiquitous and there are easy fixes.
Let’s look at some of the most frequent problems and how to fix them.

Issues with Incorrect Settings
Another of the problems that people encounter is that of wrong settings.
Here’s what to check:
Incorrect Server Settings: Just make sure that you’ve chosen the right IMAP/POP3 and SMTP settings.
For Hostinger, the incoming mail server should be:
pop. hostinger.com or imap.hostinger.com
The outgoing server should be: smtp.hostinger.com
Standard ports are 995 for POP3 (SSL), 993 for IMAP (SSL), and 465 or 587 for SMTP.
Email Account Not Set Up Right: Just confirm that your Hostinger account is correctly configured in the Hostinger control panel.
If there were any issues during the setup, it could prevent emails from sending or receiving properly.
Resolving Sync Delays or Errors
Sometimes, your emails might not sync right away.
This may occur due to some of the following reasons, but a few possibilities to mention below:
Propagation Delays: When you recently changed your DNS server or your MX records, changes can take up to 24 hours to propagate across the internet.
It can happen during this period that email receipt is delayed.
You can also rely on a DNS checker to make sure that your MX records are also pointing to mx1.hostinger.com and mx2.hostinger.com.
Email Services Disabled: Occasionally, email services might get accidentally turned off.
Verify that your email services are enabled in your Hostinger control panel.
Turn them off again if they are not right, then just turn them back on and save your changes.
Additional Troubleshooting Steps
Still having trouble?
Here are a couple more things you can try:
Resetting Your Credentials: If you’re having authentication errors, resetting your Hostinger email password might help.
After that, just update your password in Gmail’s settings and try again.
Contacting Support: If none of the above options works for you, please do not hesitate to contact Hostinger Support.
They can also assist you in determining what’s wrong, particularly if it involves a problem within your account or in your configuration.
Conclusion
It’s a smart move to link your Hostinger mail to Gmail to better organize and streamline your emails.
Gmail brings powerful tools like advanced search, customizable filters, and a simple interface, helping you stay organized and keep your communication professional.
In short, it’s professional mail functionality in Hostinger combined with the features of Gmail.
With this, you can concentrate on what counts and that is effective intercultural communication and frictionless teamwork.
So, go ahead and embrace this integration to streamline your email experience and stay in full control of your communications!