 Domain RegistrationFind and register the perfect domain for your website.
 .COM DomainChoose a widely recognized domain to build global credibility.
 All TLDsFind and register your perfect domain. Choose from local and global extensions.
 whoisCheck domain ownership details, expiration dates, and registrar information.
 US DomainRegister a .US domain and build trust in the USA.
 Web HostingEverything your website needs to run smoothly
 WordPress HostingWordPress hosting that just works
 Windows HostingReliable hosting for Windows environments
 Reseller HostingTurn hosting into your business
 Email HostingEmail that looks professional and works anywhere
 cPanel HostingFull control of your hosting with cPanel
 Affiliate ProgramJoin as a partner and earn commissions on every referral you send our way.
 Vps HostingScalable virtual servers that expand as you need.
 Dedicated ServersGet complete access and full control over your dedicated physical server.
 Managed vpsNot tech-savvy? We will take care of everything with our fully managed VPS hosting for you.
Minecraft, a place where you set the rules, craft legendary structures, and host epic battles with your friends.
But running a server off your old laptop? That’s like trying to fight a dragon with a wooden sword. You need something more powerful, more reliable… you need a VPS.
This guide is your ultimate weapon in conquering the digital world.
We’ll break down everything you need to know about Minecraft server VPS hosting on Windows, even if you’re a complete beginner.
No tech jargon, just straight-to-the-point advice to get your server up and running faster than you can say “creeper.”
Why a VPS is Your Secret Weapon for Minecraft Domination
Let’s be real, hosting a Minecraft server on your home computer is like building a castle on quicksand.
It’s unstable, unreliable, and one wrong move could bring the whole thing crashing down.
A VPS (Virtual Private Server) is like building your castle on solid bedrock. It gives you:
- Power: Dedicated resources (RAM, CPU) so your server can handle more players and mods without lagging. Think of it as upgrading from a rusty pickaxe to a diamond one.
- Control: You’re the king of your castle! Customize server settings, install mods, and create the world you want.
- Accessibility: Your server is online 24/7, so your friends can join the fun anytime, anywhere. No more “sorry, my server’s down” excuses.
- Security: Protect your world from griefers and hackers with robust security features. It’s like having an iron golem guarding your front door.
Bottom line: A VPS gives you the power and control to create the ultimate Minecraft experience.
How To Choose the Right Windows VPS Provider
Picking a VPS provider can feel like navigating the Nether – confusing and potentially dangerous.
Here’s what to look for:
Windows Support
Make sure the provider offers Windows-based VPS hosting. Some popular options include:
- Truehost: Known for its affordability and user-friendly interface.
- Vultr: Offers a wide range of server locations and powerful hardware.
- DigitalOcean: Popular for its simplicity and developer-friendly tools.
Server Resources
Consider how many players you’ll have and what mods you’ll use. More players and complex mods require more RAM and CPU power. Don’t skimp here – it’s like trying to mine obsidian with a wooden pickaxe.
Customer Support
Problems happen.
You want a provider with reliable customer support to help you slay those technical dragons.
Pricing
VPS hosting comes at various price points. Find a plan that fits your budget and needs. Remember, you get what you pay for.
Pro Tip: Read online reviews and compare different providers before making your decision. It’s like consulting a map before venturing into a new territory.
Read also: Cost of Running a Minecraft Server on VPS (Latest Figures)
How To Set Up Your Minecraft Server on Windows VPS
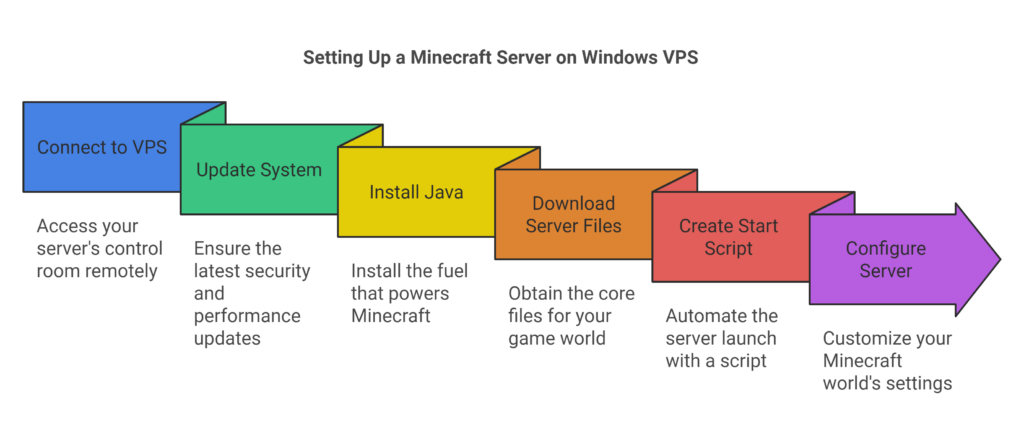
Once you’ve chosen your VPS provider, it’s time to get your hands dirty and set up your server.
Here’s a step-by-step guide:
- Connect to your VPS: Use a remote desktop connection tool to access your VPS. It’s like teleporting directly into your server’s control room.
- Update your system: Run the necessary commands to update your VPS software. This ensures you have the latest security and performance updates. It’s like sharpening your sword before a battle.
- Install Java: Minecraft runs on Java, so you must install it on your VPS. It’s like the fuel that powers your Minecraft machine.
- Download the Minecraft Server files: Grab the latest server files from the official Minecraft website. This is the core of your game world.
- Create a start script: This automates the server launch. It’s like having a magic spell that instantly sets up your world.
- Configure your server: Open the
server.propertiesfile to customize your world’s settings. This is where you set the difficulty, game mode, and other options. It’s like having the power to shape the very laws of your Minecraft universe. - Start your server: Run the start script and watch your Minecraft world come to life!
Pro Tip: Use a tool like Screen or tmux to keep your server running even if you disconnect from your SSH session. It’s like having a magical tether that keeps your server alive even when you’re away.
Essential Server Management
Running a Minecraft server is like running a kingdom.
You need to keep things in order to ensure a thriving community. Here are some essential server management tasks:
- Monitoring server performance: Keep an eye on your server’s resource usage (CPU, RAM, disk space). It’s like checking your kingdom’s vital signs to ensure everything is running smoothly.
- Backing up your world: Regularly back up your server files to prevent data loss. It’s like creating a magical copy of your world in case disaster strikes.
- Installing plugins: Enhance your server with plugins that add new features and gameplay mechanics. It’s like enchanting your world with powerful magic.
- Managing players: Moderate your server to ensure a positive and enjoyable experience for everyone. It’s like being a wise ruler who maintains order and peace in their kingdom.
Top Tools for Server Management:
- AMP (Admin Management Panel): A user-friendly web-based control panel for managing your server.
- MCMyAdmin: A powerful tool for managing multiple Minecraft servers.
- Bukkit: A popular plugin platform that allows you to customize your server with a wide range of plugins.
#4 Ways To Optimize Your Minecraft Server for Peak Performance
Want your Minecraft server to run faster than a cheetah on Redstone? Here are some optimization tips:
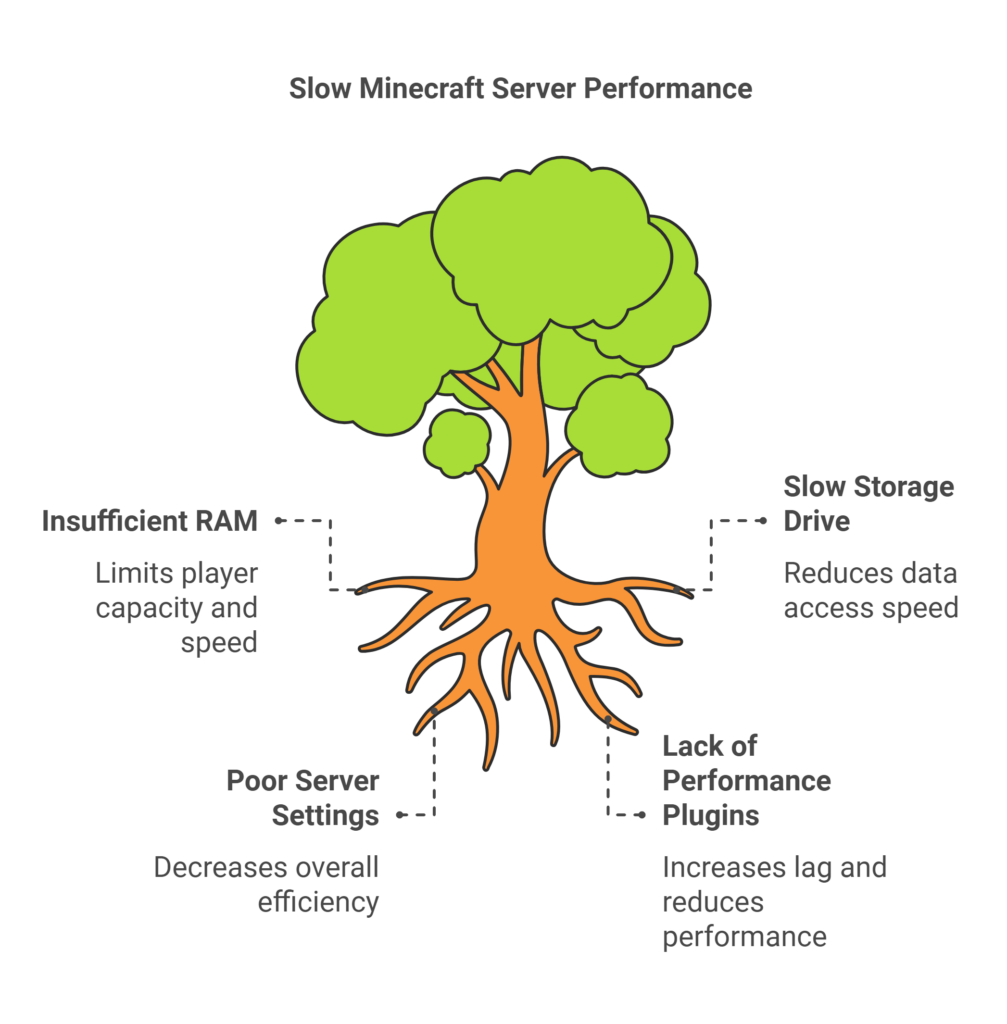
- Allocate enough RAM: Give your server enough RAM to handle the number of players and mods you have. It’s like giving your horse enough oats to run at full speed.
- Use a fast storage drive: A solid-state drive (SSD) will significantly improve your server’s performance. It’s like upgrading your horse-drawn carriage to a sports car.
- Optimize server settings: Tweak your server’s settings to improve performance. It’s like fine-tuning your car’s engine for maximum efficiency.
- Install performance-enhancing plugins: Plugins like ClearLag and NoLagg can help reduce lag and improve server performance. It’s like giving your car a turbo boost.
Pro Tip: Regularly restart your server to clear any cached data and improve performance. It’s like giving your server a refreshing nap.
#4 IDEAS To Secure Your Minecraft Server
It is not enough to do Minecraft server VPS hosting on Windows.
Don’t let griefers and hackers ruin your Minecraft paradise.
Take these steps to secure your server:
- Use a strong password: Choose a complex password for your server and your Minecraft account. It’s like building a strong wall around your castle.
- Install security plugins: Plugins like AntiGrief and WorldGuard can help protect your server from malicious players. It’s like having a team of guards patrolling your kingdom.
- Keep your server software updated: Regularly update your server software to patch any security vulnerabilities. It’s like reinforcing your castle walls to withstand any attack.
- Whitelist your server: Only allow trusted players to join your server. It’s like having a guest list for your exclusive kingdom.
Pro Tip: Be cautious about the plugins you install. Some plugins may contain malicious code that could compromise your server’s security. It’s like inviting a Trojan horse into your castle.
How To Troubleshoot Common Minecraft server VPS hosting on Windows Issues
Even the best-run servers can encounter problems.
Here are some common issues and how to fix them:
- Server lag: This can be caused by insufficient RAM, a slow hard drive, or too many players. Try upgrading your server resources or optimizing your server settings.
- Connection problems: Make sure your firewall is not blocking the server’s ports. You may also need to configure your router to forward the necessary ports.
- Plugins conflicts: If you’re experiencing problems after installing a new plugin, try disabling it to see if that resolves the issue.
- World corruption: This can happen due to unexpected server crashes or corrupted files. Regularly back up your world to prevent data loss.
Pro Tip: Check your server logs for error messages. These logs can provide valuable clues for troubleshooting problems. It’s like consulting your kingdom’s historical records to understand past events.
Level Up Your Minecraft Experience with a Windows VPS
Hosting your own Minecraft server on a VPS is like taking your gameplay to the next level.
You have the power to create your own world, customize the rules, and share the fun with your friends.
With this guide, you’re well-equipped to conquer the digital world and build a Minecraft empire that will be the envy of all your friends.
So what are you waiting for?
Grab your pickaxe, fire up your VPS, and let’s get crafting!
Read also: