 Domain RegistrationFind and register the perfect domain for your website.
 .COM DomainChoose a widely recognized domain to build global credibility.
 All TLDsFind and register your perfect domain. Choose from local and global extensions.
 whoisCheck domain ownership details, expiration dates, and registrar information.
 US DomainRegister a .US domain and build trust in the USA.
 Web HostingEverything your website needs to run smoothly
 WordPress HostingWordPress hosting that just works
 Windows HostingReliable hosting for Windows environments
 Reseller HostingTurn hosting into your business
 Email HostingEmail that looks professional and works anywhere
 cPanel HostingFull control of your hosting with cPanel
 Affiliate ProgramJoin as a partner and earn commissions on every referral you send our way.
 Vps HostingScalable virtual servers that expand as you need.
 Dedicated ServersGet complete access and full control over your dedicated physical server.
 Managed vpsNot tech-savvy? We will take care of everything with our fully managed VPS hosting for you.
As many would agree, Namecheap is best known for its domain marketplace but this company does not only lend domain names to customers, rather it has a dedicated email hosting service, which can be used for your personal order business purposes.
Customers can create a custom email address which expresses their brand name and identity a bit more with the help of Namecheap email services. Such a feature is extremely essential especially for professionals who would like to communicate professionally even when responding to emails.
If these users don’t know how to go through the signup for Namecheap and login to their email accounts, they might find it challenging to receive an email for extensions.
This provides a smooth login experience that allows one to effortlessly check emails, undertake assignments and interact with clients and coworkers.
Therefore, in this article, we are going to show you how to smoothly log into this email, what to do if you forget your password, and some useful tips while working with this service.
How to Sign In to Namecheap Email
It doesn’t matter if you use Namecheap mail throughout the websites or you want to log in to your Namecheap account which you have created – no matter what, logging into the Namecheap email is a simple leathal experience. Therefore, here are instructions for you to use so that you can start sitting back and relaxing.
Step-by-Step Guide to Accessing Namecheap Email via Webmail
1. Launch Web Browser: Start the following steps by initiating any web browser that you use.
2. Visit the Webmail Login Page: You can reach your Namecheap email using either of the following links:
- https://privateemail.com
- http://mail.yourdomain.com (remember to exchange “yourdomain.com” with your actual domain name).
3. Fill in Your Details:
- Username: Type in your email address which you registered that starts with your full name (e.g. [email protected]).
- Password: Type in the password assigned to your email account.
4. Press the “Log In” button: After filling out the login fields, press the “log in” button to enter the inbox page.
Having signed in, you will be able to send and receive emails together with all the calendar and contacts from the website itself.
Other Options for Accessing Your Namecheap Email From Your Namecheap Account Dashboard
Should you choose to take a different approach, you may log into your Namecheap email, again, this time via the Namecheap account dashboard:
- Open Your Namecheap Account: Go to your Namecheap homepage, then you will see a ‘Sign In’ button at the right upper side of the page.
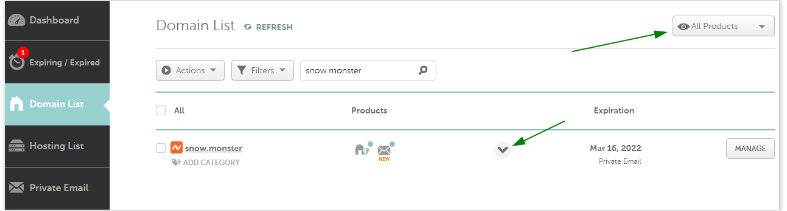
- Click on Domain List: After successfully logging in, simply look for the Domain List option located on the left sidebar.
- Choose Your Domain: Search the domain linked with the Private Email service and click it.
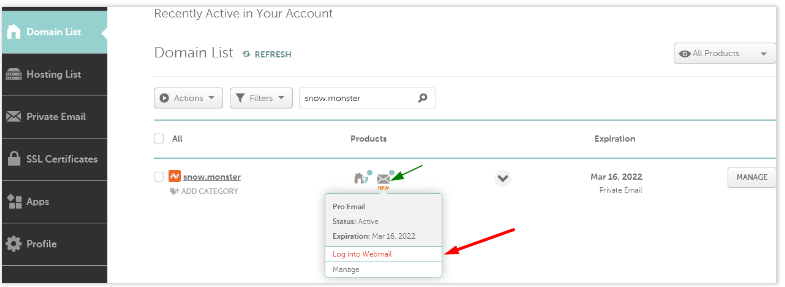
- Click on the arrow {▼} and look for other services that go with the domain name you opened in the last step.
- In the Private Email section, click on Log into Webmail. This will take you straight to your email inbox without requiring you to input the login information again.
Troubleshooting Login Issues
Though built in a simple and understandable form, users can experience login problems on certain occasions. Some of the frequently experienced problems and solutions are outlined below.
Common Login Problems
- Recovery of Detracted Passwords: If you can’t recall the password that you have set, that is going to be a great barrier for you during the login session.
- Concerns with Your Username: It’s not uncommon for people to either forget their entire email address or not correctly type it in when logging in for the first time.
- Provision of Account Access: Too many wrong attempts at typing in your username/password can cause your access to account to be locked out for a period of time.
Methods on Changing Passwords and Username Recovery
- Changing Your Password:
- On the login page, select either ‘Have you forgotten your password?’, ‘Reset password?’.
- Give out the email address that you have and go through the mail received to that email for further assistance steps.
- Password that complies with the required standards for security has to be picked out that is ranging between eight or more characters, contains capital/lower case letter plus a number.
- Recovering your Username:
- In case your username is misplaced, the best thing to do is check any emails sent by Namecheap before that may have included that email, or any support staff of the company.
Practical Advice on How to Change the Settings of the Browser and Delete the Cache
In cases of continuous login failures even when the right credentials are provided:
1. Clearing Browsing Data and Location – Cache and Cookies :
- Since some old data may cause problems while logging in, simply go to your browser’s settings and delete the cache and cookies stored on your computer.
2. Disabling Browser Extensions:
- Disable any type of extensions which may be interfering with webmail capabilities such as ad blockers or privacy tools.
3. Changing the Browser or Using Incognito Browsing:
- Changing the browsers or using the incognito mode can help rule out whether the problem is solved by the browser in use.
Understanding Email Credentials
When utilizing Namecheap’s email services, it is imperative to know what your email credentials are and the need of their protection for safe online conduct.
Explanation of What Constitutes Your Email Credentials
Identity. As is natural in these cases, your email credentials are composed of two mutually-granting fragments:
- Username: This is what is usually your full e-mail address ([email protected]). It is the name of your account in the email system and is used to log on to the email.
- Password: This is the secret code that is used to access one’s email account. Password protects account from intrusion and hence is necessary to preserve it.
These are the primary credentials needed for an account log. They are also the first line of security against IMAP and POP3 account configuration vulnerability.
Importance of Keeping Credentials Secure and Updated
There are several reasons as to why gaining and retaining the security of your email Account credentials is important:
- Protection against hacking: Weak and compromised passwords pose a risk to your account as it can be hacked and used to leak and exploit possible information or steal identity in the worst case scenario. Always remember to regularly update your password and use complex combinations as they can help in minimizing the chances.
- Avoiding phishing: Forgetting about where you enter your credentials will lead to account hacking. Cybercriminals discreetly try to log into the users accounts by sending them phishing emails with login fields inside them and so with some attention of your enter Credentials and some degree of login authoristations, these attacks can be somehow bounded.
- Update of the credentials: It is possible that you are unable to login to your account for instance after forgetting your password or even actually changing with the time the issue with logging in arises. From the recovery options provided including but not limited to, email backup or security questions, use these to ensure faster and more time effective recovery.
Managing Email Settings After Login
At the point when you’ve logged into your Namecheap email account, there are different aspects of settings throughout the system that you may want to adjust for a better experience and enhanced security.
The other part of this section will provide information on all or some settings that users want to adjust once they have logged into their accounts:
1. The password section: Changing Your Password: Recommendations.
- Change Of Password to Maintain Security: Password change should be frequent, thus update your password as the need comes. To change your password:
- First access the System tab, and select the Settings.
- Then, click on Basic Settings, then proceed to search for the area where you will alter the password.
- A stronger password must be created and confirmed on the following page after the change.
2. Possibilities offered in Email Forwarding Options:
- In a case where you want to avoid missing some important messages, you can establish forwarding from one email address to another. This is helpful for managing multiple accounts or so that you don’t lose important messages.
- To do this, go to the settings panel, and in the Forwarding section, specify the email address that you will receive messages in.
3. Building Filters:
- You can create filters to enable automatic sorting of emails that are delivered to your inbox according to set criteria such as the sender, subject heading, and so on. This minimizes the clutter in your inbox and helps to ring-fence critical messages.
- Find and access the filters section in settings and create the rules for processing incoming emails.
Two-Step Verification for Added Protection: How to do it
Two-step verification requires one to not only give their password but also provide a second verification while logging in.
1. Activate 2FA:
- Access your Namecheap email account.
- On the System menu, go to Security settings.
- Search for Two-Factor Authentication and switch it on using the instructions given.
2. Select Your Verification Method:
- You might have possibilities like receiving a code via text message or use an authentication application (e.g. Google Authenticator) for generating codes.
3. Complete Setup:
- Make sure to follow the given steps in linking your phone number / authenticator app and save the backup codes so as to retain access to primary verification method even after it has been lost.
Read also: Namecheap Email Forwarding: Benefits and Setup Guide
Accessing Namecheap Email on Mobile Devices
It is also important to note that access to your Namecheap email account on your mobile devices is necessary for you to be able to stay in touch while on the move. For instance: if you prefer using custom-made mobile applications or email client configurations, here is how to log in and configure your Namecheap email.
Instructions for Signing into Namecheap Email on Mobile Devices Using Apps
#1. Using the Webmail App:
Step 1: Search and click this webmail URL in your phone’s browser:
https://privateemail.com or http://mail.yourdomain.com (make sure you replace “yourdomain.com” with your actual domain).
Step 2: Put your username and password in the appropriate fields.
Step 3: Click on the button labeled “Log In” and wait while your inbox loads.
#2. Using Mobile Email Apps:
a). For Android:
Step 1: Locate and click the Settings icon on your device.
Step 2: Click on Accounts and then select Add Account.
Step 3: Click on Email and fill in your whole email address and the password you have set.
Step 4: Select the preferred protocol (cross-device synchronization: IMAP).
Step 5: Use the following server details:
- Incoming Server: mail.privateemail.com
- Port: 993 (SSL)
- Outgoing Server: mail.privateemail.com
- Port: 465 (SSL)
Follow any other form of prompts to end the procedure.
b). For iOS (iPhone/iPad):
Step 1: Begin by clicking the Settings icon.
Step 2: Scroll down and tap on the option Mail then tap on Accounts.
Step 3: Select the option Add Account and Other.
Step 4: Fill in your name, your email address, your password and a short description of the account.
Step 5: Choose IMAP and now the incoming and outgoing servers as described above.
Step 6: Also, save everything after this to finalize the configurations.
How to Configure Email Clients (like Outlook, Thunderbird) with Namecheap Accounts Settings
In case you use the Outlook Desktop App, configuring the same email for your Namecheap account works too:
1. Setup for Outlook:
- Launch Outlook and select File > Account Settings > Add new account.
- Click on “Email” and type your first name, full email, and the account password.
- Select “I’ll configure the server settings” then “POP or IMAP” for the account type.
- Fill in the incoming and outgoing server settings as follows:
- Hostname: mail.privateemail.com
- Port: 993 for IMAP connections (SSL)
- Hostname: mail.privateemail.com
- Port: 465 for SMTP connections (SSL)
- Hostname: mail.privateemail.com
- Make sure “Require logon using Secure Password Authentication (SPA)”, is unchecked.
2. Setup for Thunderbird:
- Launch Thunderbird and select Tools > Account Settings > Account Actions > New Email Account.
- Type your name, email and password in the appropriate fields.
- Press “Manual Settings” to input the server settings:
- Hostname: mail.privateemail.com, Port: 993, SSL: SSL/TLS
- Hostname: mail.privateemail.com, Port: 465, SSL: SSL/TLS
- Press “Finish” when all settings are completed.
As long as you follow these steps, there will be no problem in being able to link your Namecheap email on your handheld devices or on desktop clients, thus allowing you to be on the go with ease of connection.
Read also: Namecheap Email Setup: A Beginner’s Guide!
Getting Support from Namecheap
When you are trying to sign into your Namecheap email account or have some issues with configurations, you can use the following support options offered by Namecheap.
Contacting Namecheap Support: How to Deal With Login Problems
1. Live Chat Support:
You can go to the Namecheap website and you can click on the option of live chat that can be found below the right corner of the page and you will be able to speak to a support agent without delay.
2. Raise a Support Ticket:
Some customers may wish to communicate in a more formal manner, and they may raise a support ticket from their Namecheap account dashboard. All support requests should have clear descriptions of the case to help solve it faster.
3. Phone Support:
In case of emergent issues, then customers may call the customer support of Namecheap but this is possible when the working hours are observed.
Utilizing Namecheap’s Knowledge Base and Community Forums for Assistance
- Knowledge Base:
Moreover, there has been compiled an enormous knowledge base of articles, manuals as well as a big number of frequently asked questions regarding a range of issues pertaining to Namecheap’s services, such as email configuration.
- Community Forums:
Connect with other users in the Namecheap community forums and ask questions, share experiences, and receive advice from other users and the company experts.
Read also: Namecheap Email Hosting: Features, Plans, Setup, and Support
Conclusion
To achieve effective and reliable management of communication activities, smooth access to your Namecheap email account or so to speak, your correspondence is important. No matter if you are using webmail or a mobile app, knowing the basics of login and how to resolve any problems is vital in ensuring seamless interaction. We encourage those who have such problems to use the opportunities. Resources such as the support team of Namecheap, or its knowledge base or community forums are useful when dealing with such issues and enhance your email experience. We encourage you to comment about your experiences or ask about any issues you have in the comments. Your comments may indeed assist other users who are in similar situations, thereby creating a family of Namecheap users.