 Domain RegistrationFind and register the perfect domain for your website.
 .COM DomainChoose a widely recognized domain to build global credibility.
 All TLDsFind and register your perfect domain. Choose from local and global extensions.
 whoisCheck domain ownership details, expiration dates, and registrar information.
 US DomainRegister a .US domain and build trust in the USA.
 Web HostingEverything your website needs to run smoothly
 WordPress HostingWordPress hosting that just works
 Windows HostingReliable hosting for Windows environments
 Reseller HostingTurn hosting into your business
 Email HostingEmail that looks professional and works anywhere
 cPanel HostingFull control of your hosting with cPanel
 Affiliate ProgramJoin as a partner and earn commissions on every referral you send our way.
 Vps HostingScalable virtual servers that expand as you need.
 Dedicated ServersGet complete access and full control over your dedicated physical server.
 Managed vpsNot tech-savvy? We will take care of everything with our fully managed VPS hosting for you.
Do you want to control your inbox more effectively? Migrating your Hostinger email to Outlook might just be the answer!
It is a good idea if you want to take advantage of all the finest features of Microsoft Outlook, yet keep your work email mailbox on the servers of Hostinger.
Whatever your aim—to optimize your email management or utilize the useful power bars of Outlook to stay organized—knowing how to configure it is essential.
In this guide, we’ll walk you through the steps to connect your Hostinger email to Outlook.
By the end, it will be working perfectly at boosting your communication and productivity by previous standards!
Understanding Hostinger Email Configuration
What is an Email Client?
An email client is an application on the computer, the tablet, or the mobile phone that can be used to transmit, receive, and manipulate the user’s emails.
It acts as an intermediary between the user and the email server, and therefore can efficiently and intelligently transmit and process the messages.
Some of the well known email clients include Microsoft Outlook, Mozilla Thunderbird, Apple Mail.
The benefit of these applications is that they provide an easy-to-use channel for email writing, inbox management and accessing multiple email accounts from a single application.
POP3 vs IMAP: Which One to Use with Outlook?
Configuring email in Outlook lets you, programmatically, decide if you want to use POP3 (Provider of Post Office Protocol) or IMAP (Internet Message Access Protocol).
POP3 downloads emails from the server to your computer and usually deletes email from the server.
That is, after emails are downloaded to the computer they are accessible only on that computer.
POP3 is suitable for those users who are interested in managing email from a distance and do not need to reach their email from multiple devices.
By contrast, IMAP synchronizes emails between the server and all clients.
Anything that changes (e.g., reading or deleting an email) is never different on any and all devices.
Therefore, IMAP is especially suitable for all users who aim to retrieve their messages from more or less different locations or devices.
This is since it is the data management tool which allows the best possible management and optimization of messages in real time.
Prerequisites for Setup
There are some prerequisites to be met before you begin configuring your Hostinger email address in Outlook, or it will not work in the expected way.
Hostinger Email Account Login Details
You will need the login information for your Hostinger email account.
This includes:
Your full email address (e.g., [email protected]).
The password associated with your Hostinger email account.
If you forgot your password, you can reset it with the use of the Hostinger control panel.
Also, you’ll have to collect the necessary server configuration for the incoming and outgoing mail.
These settings typically include:
Incoming Mail Server (IMAP): imap.hostinger.com
Incoming Port: 993 (with SSL/TLS encryption)
Outgoing Mail Server (SMTP): smtp.hostinger.com
Outgoing Port: 465 or 587 (with STARTTLS or SSL/TLS encryption) 123.
Outlook Version Requirements
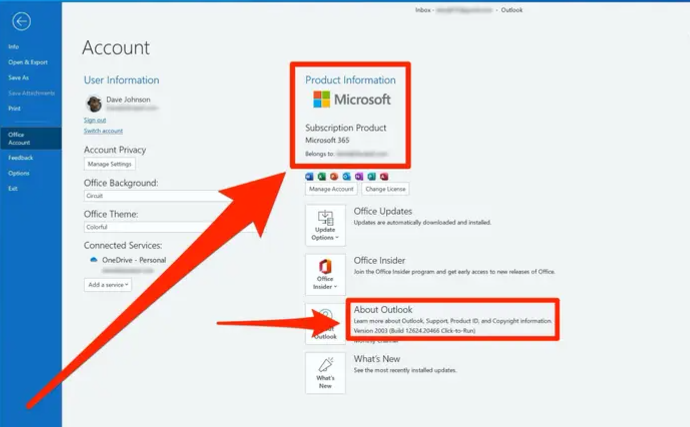
Make sure you have Microsoft Outlook installed on your machine with a supported version.
The process of configuration may differ between versions; however, the versions most commonly used are:
1. Outlook 2019
2. Outlook 2016
3. Outlook for Microsoft 365
Latest version is suggested to be used in order to achieve the benefits of new functionalities and enhanced security.
The most recent version may be downloaded and installed on the computer if it is not installed on the computer yet.
Step-by-Step Guide to Configure Hostinger Email in Outlook
The configuration of Hostinger email accounts in Microsoft Outlook enables the management of business correspondence in an easy way.
Please adhere to this step-by-step instruction, as this process will contribute to an easy configuration.
1. Accessing Hostinger Email Settings
Login to Hostinger: Start by logging into your Hostinger account. Navigate to the Emails section on your dashboard.
Locate Email Settings: Provide a mail address that you wish to configure and click on the Manage button to the side of it.
Note Server Details: In the left sidebar click on Connect Apps Devices.
Here, you will find the necessary details for both the incoming and outgoing mail servers.
Note down the following:
Incoming Server (IMAP): imap.hostinger.com
Incoming Port: 993 (with SSL/TLS)
Outgoing Server (SMTP): smtp.hostinger.com
Outgoing Port: 465 or 587 (with SSL/TLS or STARTTLS)
2. Setting Up Email in Outlook
Open Outlook: Launch the Microsoft Outlook application on your computer.
Navigate to Account Settings: If you already have an existing email account, click on the File menu, then select Add Account.
If you have opened Outlook for the first time, you will immediately be asked to add an email account.
Add a New Email Account: Type your full Hostinger email, and choose Advanced setup.
Choose IMAP: When prompted, select IMAP as your account type.
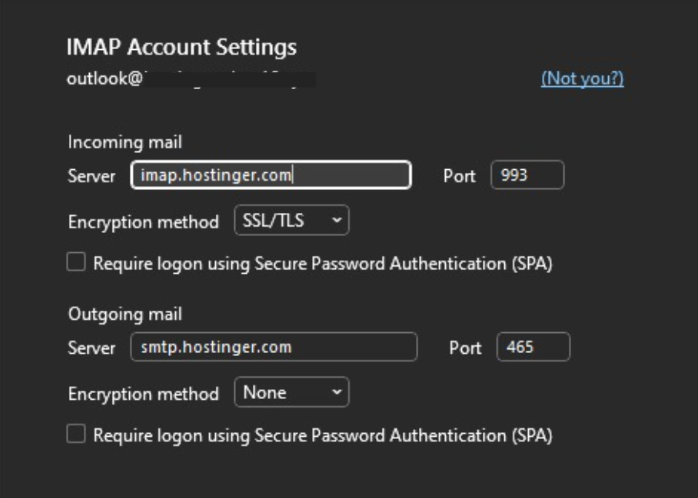
Enter Server Details:
For the incoming server, enter:
Server: imap.hostinger.com
Port: 993
Encryption Method: SSL/TLS
For the outgoing server, enter:
Server: smtp.hostinger.com
Port: 465 or 587
Encryption Method: SSL/TLS or STARTTLS
Input Credentials: Please enter your email address as the username and the password linked to your hostinger email address.
Make sure you check for any options to display more of the settings if required.
3. Testing the Configuration
Send and Receive Test Emails: Once you have completed the setup, send a test email to ensure that both sending and receiving functionalities are working properly.
Troubleshooting Common Setup Issues:
When mail sending/receiving problems happen, please ensure all server settings and ports are correct.
Make sure that your internet link is stable and that there are no firewall rules that are being prevented from communicating with the mail servers.
If there are ongoing problems, please attempt to reset your email password or look at the troubleshooting steps provided for Hostinger at Hostinger’s support articles.
Tips for a Seamless Experience
To ensure a smooth and efficient experience when using your Hostinger email with Outlook, consider the following tips:
Ensuring Proper Sync Settings
Sync Frequency: Modify the synchronization settings in Outlook so that it knows how frequently the synchronization process will check for fresh inbox items.
And you can configure it at a speed that makes sense to your workflow, so that you’ll be notified without getting drowned in your inbox.
Folder Synchronization: Make sure that all necessary folders (like Sent, Drafts, and Trash) are synchronized.
This can be configured in the account settings under the IMAP folder settings, allowing you to manage your emails effectively across devices.
Security Best Practices
Enable SSL/TLS: If SSL/TLS encryption is to be used for both client and server mail servers then SSL/TLS encryption must be forced to be applied to both the incoming and outgoing mail servers.
This secures your email communications against interception.
Configuration settings for the IMAP and SMTP server connections must comply with this.
Use Strong Passwords: Create strong, unique passwords for your Hostinger email accounts.
A string of letters, numbers, and symbols are proposed for enhanced security.
Enable Two-Factor Authentication (2FA): If available, enable two-factor authentication on your Hostinger account.
This adds an additional layer of security by requiring a second form of verification, such as a code sent to your mobile device.
Regularly Update Passwords: Periodically refresh the email access password and its associated SMTP parameters to prevent security vulnerabilities resulting from potential security breaches.
Conclusion
In conclusion, configuring your Hostinger email in Microsoft Outlook is a straightforward process that can significantly enhance your productivity and streamline your communication.
By following the outlined steps—accessing your Hostinger email settings, setting up your account in Outlook, and testing the configuration—you can ensure a smooth integration that allows you to manage your emails efficiently.
In particular, by adhering to best practice, for instance, by configuring suitable sync parameters and giving more consideration to security issues, the user experience can be enhanced even more.
Thanks to the integration of the Hostinger email in Outlook, all of its powerful capabilities are available to you in order to stay organized and responsive in personal or professional messages.
It is worthwhile to implement this for your daily tasks.
Jump on board with ease and speed in which access to your inbox can be achieved by using Outlook and be amazed at how Outlook can be the change in your communication world!